
Get started with editing in ArcGIS Pro
An edit session automatically starts when you modify existing data or create new data, and stops when you save or discard your changes.
Subsequent edits will resume the edit session until saved or discarded once more.
The content below steps you through a basic workflow for editing features in a map.
- Open the project
Open the project containing the features you want to create or edit. If you don't have a project, create a new project and create the feature classes in the default geodatabase, or start without a project template and save your work later.
- Start ArcGIS Pro and sign in if necessary.
-
On the start page, do one of the following:
- To open an existing project, click a recent project, or click Open another project and browse to the project.
- To start a new project, click the map project template.
- To start a new untitled project and save it later, click.
Note: When you open a project on a Portal connection, the project package (.ppkx) is downloaded and unpacked in the <User Documents>\ArcGIS\OnlineProjects folder. After you close the project, the unpacked project file (.aprx) appears in the recent projects list.
- Add data to the map
Open the map containing the features you are editing. If the map doesn't contain your layers, add them. A feature template with default settings is automatically generated for new layers.
- On the ribbon, click the View tab. In the Windows group, click Catalog Pane.
Tip: To open all panes related to editing, click Reset Panes, and choose Reset Panes for editing. - In the Catalog pane, right-click the map containing the features you are editing, and click Open.
- If the map doesn't exist, on the Insert tab, in the Project group, click New Map.
- If the current map doesn't contain the layers you are editing, add them.
- In the Catalog pane, click Databases.
- Expand the database containing your data, or the default database in which you are creating new feature classes.
- Drag the feature class onto the map.
A feature template with default settings is automatically generated for the new layer.
- To create a feature class, complete the following steps:
- Expand and right-click the database, click New and click Feature Class.
- Type the feature class name.
- Click the Feature Class Type drop-down arrow and choose the feature geometry you create.
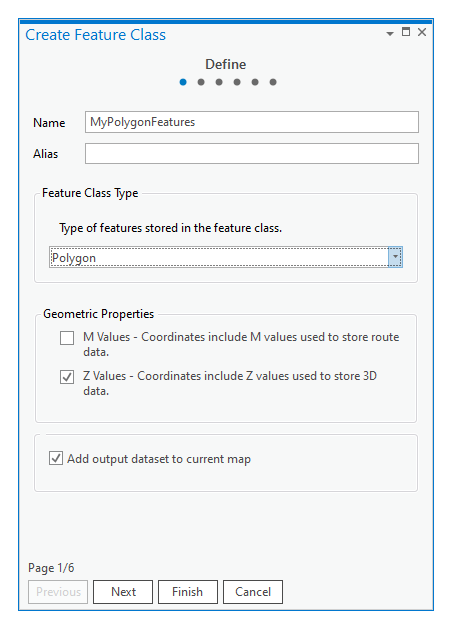
- Click Next and add fields for the attributes you want to record with each feature.
- Click Next and choose a coordinate system.
- Click Finish.
The new feature class is automatically added as a layer to the map and contains no features until you create them.
- On the ribbon, click the View tab. In the Windows group, click Catalog Pane.
- Document your data
Metadata is descriptive information about your data, such as when and how it was recorded, contributors, use limitations, and so on. It is searchable in the Catalog pane and can help others find your data and assess the appropriateness of using it with their work.
- In the Catalog pane, right-click the feature class and click Edit Metadata.
- In the Metadata view, type the appropriate information in the required fields.
- On the Metadata tab, in the Manage Metadata group, click Save.
- On the Metadata view tab, click.
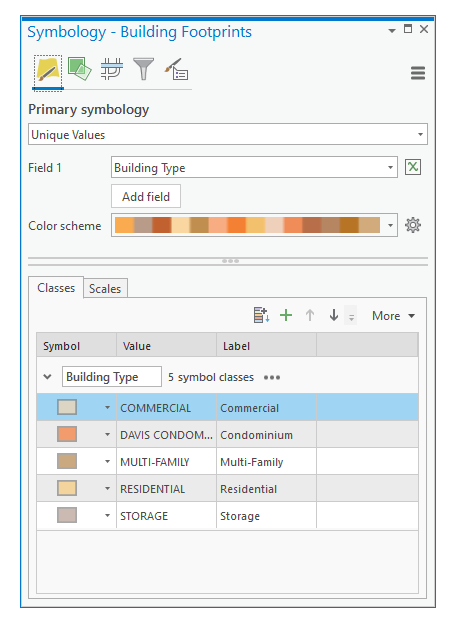
- Symbolise the layer
Symbolising a feature layer configures it to draw features using a specific symbol. Creating a new feature class and adding it to a map automatically generates a default symbol. The symbol also appears in the Create Features pane for templates that create features on the layer.
- On the View tab, in the Windows group, click Contents.
- In the Contents pane, click a layer.
- To open the Symbology pane and change the symbology, right-click the layer and click Symbology.
Tip: This command is also available on the Appearance tab.
- Confirm layer editability
By default, an edit session is automatically started when you modify or create data. The session automatically stops when you save or discard your edits. For this reason, it is good practice to confirm layer editability and turn off editing for layers you want to protect.
Note: To manually enable and disable editing tools and feature templates, turn on the Edit button in project Options.
- On the Edit tab, in the Manage Edits group, click Status.
- Review the editing permissions for the layers in your workspace, note the layers that you can edit, and click Close.
- To disable editing, uncheck the layer in the Contents pane on the List By Editing tab.
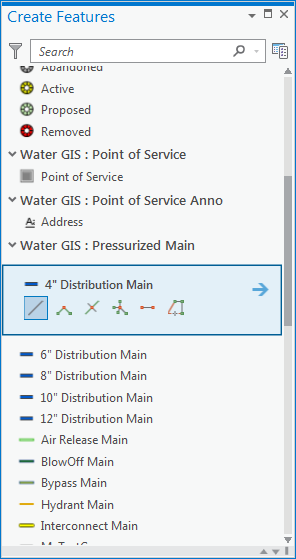
- Create features
In the Create Features pane, feature templates contain the primary tools with which you create features. Adding a feature layer to a map automatically generates a feature template with default settings. Clicking a template shows its tool palette.
- On the Edit tab, choose your snapping preferences, and show the Create Features pane.
- In the Snapping group, click the Snapping drop-down menu and enable your snapping preferences.
-
In the Features group, click Create.
Tip: To open all panes related to editing, on the View tab, in the Windows group, click Reset Panes, and choose Reset Panes for Editing.
- In the Create Features pane click a feature template. Note: Warning icons appear with templates that create nonvisible features for reasons that include: mismatched scale range settings, missing symbology attribute values, a failed definition query, and so on.
-
Click the Active template button and type the attributes values you want to apply to the feature.
Tip: To save the attribute values with the template and reuse them the next time you use the template, click the menu button, and click Properties.

- Click a construction tool, or use the default tool, and create the feature.
- To finish the feature, right-click and click Finish, or press the F2 key.
- On the Edit tab, in the Manage Edits group, click Save.
- On the Edit tab, choose your snapping preferences, and show the Create Features pane.
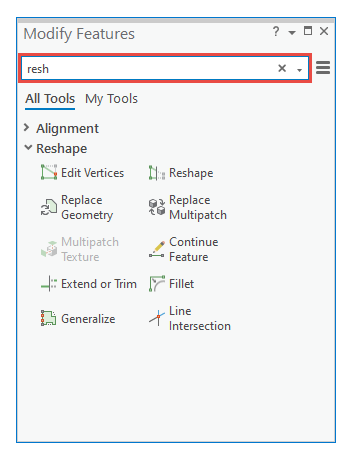
- Modify a feature
The Modify Features pane contains the primary editing tools with which you modify features. Most tools edit features interactively using the pointer. Some tools operate like geoprocessing tools and require typing parameters and clicking a run button.
On the Edit tab, in the Manage Edits group, turning on map topology allows you to edit topologically shared geometry. Tools that can switch between feature and topological editing modes show Features and Edges tabs.
Selection tools that appear with editing tools combine additional functionality for performing specific edits. The best practice is to use the selections tools that appear with a tool instead of the general selection tools on the Edit tab.
- On the Edit tab, in the Features group, click Modify.
- To show tools that perform specific edits, type the name, category, or part of a name in the Search box.
- Edit the feature following the steps prescribed by the specific tool.
- To finish the feature, right-click and click Finish, or press the F2 key.
- On the Edit tab, in the Manage Edits group, click Save.