Where you store your data impacts how you access, edit, validate, secure, and scale it. Discover the storage options available in ArcGIS Enterprise and understand how to manage data to provide a foundation for your mapping, analysis and decision-making workflows.

Databases and services
Publishers and ArcGIS Server administrators can register databases, folders, cloud stores, big data file shares and raster stores. Here's how.
- Registering a database
To register a database (including one that contains an enterprise geodatabase) and allow services to reference data in the database, follow the next set of steps. For file geodatabases, use the option described in the subsequent section titled Register a folder. To register a database connection to a cloud data warehouse, add a data store item in the portal.
1. Sign in to ArcGIS Server Manager, and click Site > Data Stores.
2. Click the Register drop-down arrow and select Database.
3. Provide a unique name for the registered database.
Names can be alphanumeric and contain spaces.4. Click Import.
A window appears where you can browse the database connection file (.sde or .odc only) on disk.5. Depending on how you set up your data sources to work with ArcGIS, choose one of the following scenarios:
- If the publisher's machine and the ArcGIS Server site are working with the same database, click the Same as publisher database connection check box. This specifies the publisher's machine, and ArcGIS Server will view and access data residing in the same database. To learn more about this scenario, see 'Data sources' for ArcGIS Server.
- If the publisher's machine and the server are working with different databases, click Import next to the Server database connection section and select a database connection file (.sde).
Server Manager does not allow you to automatically create a geodata service to link your registered enterprise geodatabases. Optionally, you can create a geodata service after registering. Geodata services are only supported with enterprise geodatabases, not with databases.
6. Click Create.
The database you registered appears on the Registered Data Stores dialog box. - Registering folders
Using the Data Stores tab, you can register a local file directory or shared directory that contains GIS resources and data, such as shapefiles or file geodatabases. When you register a directory, all subdirectories under the specified folder are also registered with the server.
Note: To register a folder as a big data file share, see the steps in the Register a big data file share section. To register a folder as a raster store, see the steps in the Register a raster store section.
Follow these steps to register a folder and allow services to reference the data in the folder and its subfolders:
1. Sign in to ArcGIS Server Manager, and click Site > Data Stores.2. Click the Register drop-down arrow and select Folder.
3. Provide a unique name for the registered folder. Names can be alphanumeric and contain spaces.
4. For Publisher Folder Path, specify the full path to the publisher's folder, for example, C:\data, or \\myserver\share\data.
Note: You cannot browse directories in ArcGIS Server Manager. You must provide the full path to the folder you want to register.
5. For Publisher Folder Host Name, specify the machine that is hosting the publisher's folder.
You can specify the machine name (MyServer), fully qualified domain name (MyServer.domain.com), IP address (12.34.56.789), or localhost (localhost).6. Depending on how you set up your data sources to work with ArcGIS, choose one of the following scenarios:
- If the publisher's machine and the ArcGIS Server site are working out of the same folder, check the Same as publisher folder path check box.
This specifies that the publisher's machine and ArcGIS Server site will view and access data residing in the same folder. To learn more about this scenario, see Data sources for ArcGIS Server.
- If the publisher's machine and the ArcGIS Server site are working out of different folders, specify the full path to the server's folder in the Server Folder Path section.
- Registering cloud stores
Using the Data Stores tab, you can register a cloud store for the following uses:
- Store map and image service caches for ArcGIS Server sites running in the cloud.
- Register a cloud store and subsequently register it as a raster store to use as an output location for raster analysis tools and to store hosted imagery layer data you upload in the Create imagery layer wizard in the portal website.
- Register a cloud store and subsequently register it as a big data file share for GeoAnalytics Tools in the portal Map Viewer Classic or ArcGIS Pro.
Prerequisites for registering a cloud store include the following:
- You must create the container or bucket in the cloud storage location before registering the cloud store.
- If you will use the cloud store for map and image service caches, this container or bucket must contain a folder named arcgiscache before you register the cloud store.
- ArcGIS Server Manager must communicate over HTTPS when registering or editing a path for a cloud store.
- For best performance, all ArcGIS components should be deployed in the same cloud region.
- When you register a cloud store, all subfolders in that location are also registered with the ArcGIS Server site.
Follow these steps to open the Register Cloud Store dialog box:
1. Sign in to ArcGIS Server Manager, and click Site > Data Stores.
2. Click the Register drop-down arrow and select Cloud Store.
3. ArcGIS Server supports the following cloud store locations. Follow the steps below based on the environment with which you're working.
- Amazon Simple Storage Service (S3) or S3 compatible storage
- Microsoft Azure Blob storage - Microsoft Azure Data Lake stores can only be used for big data file shares.
- Google Cloud storage - Google Cloud buckets cannot be used for big data file shares.
- Alibaba Cloud Object Storage Service (OSS) - Alibaba OSS buckets cannot be used for big data file shares.
- Registering a raster store
Using the Data Stores tab, you can register a raster store that is used for storing hosted raster datasets generated by raster analysis tools and the From Local input option in the Create imagery layer wizard in the ArcGIS Enterprise portal website. The raster store can be of different types, such as a file share or a cloud store.
To register a file share as a raster store, complete the following:
1. Name: Provide a unique name for the registered location containing alphanumeric characters and underscores.
2. Type: Click the Type drop-down arrow and select File Share.
3. Path: Specify the full path to the raster file share, for example, \\myserver\share\rasterFileShare. Avoid using local paths, such as C:\rasterFileShare, unless the same data folder will be available on all nodes of the server site.
Note: You cannot browse directories in ArcGIS Server Manager. You must provide the full path to the folder you want to register.
4. Click Save. The file share you registered appears on the Registered Data Stores dialog box.
- Register a cloud store as a raster store
To register a cloud store as a raster store, you must first add the cloud store as a registered data store. For more information, review the Register a cloud store section above.
Once the cloud store is available in your list of registered data stores, you can complete the following steps to register the cloud store as a raster store:
1. Name: Provide a unique name for the registered location containing alphanumeric characters and underscores.
2. Type: Click the type drop-down arrow and select Cloud Store.
3. Click the Cloud Store drop-down arrow and select your registered cloud store.
4. Click Create. The cloud store you registered appears on the Registered Data Stores dialog box.
- Register a big data file share
ArcGIS GeoAnalytics Server can read collections of delimited files (for example, .csv and .tsv), ORC, parquet, and shapefiles as an input. These datasets are identified by a registered big data file share with the following types: file share, cloud store, Apache Hadoop Distributed File System (HDFS), or Apache Hive.
When registering a big data file share, you register a parent folder for file shares, cloud stores, and HDFS or a metastore for Hive that contains one or more subfolders with datasets. A single data file or multiple data files of the same type and schema can be in a single folder. Learn how to register as big data stores here.
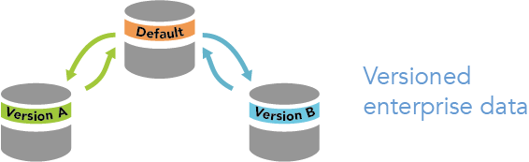
Versioning
- Overview of versioning
In multiuser editing scenarios, versions allow editors to work with the same data at the same time within an enterprise geodatabase, without applying locks or duplicating data by giving each editor their own unique, isolated view of the data. While versions are not separate copies of the geodatabase, they facilitate long transactions by allowing editors to work isolated within their own version of the geodatabase and across multiple edit sessions. Once an editor finishes a collection of edits, they can merge their changes back to the original parent version, known as the default version, from which their version was created.
- Versioning types
There are two types of versioning available, each catering to specific workflows and deployment options:
- Branch versioning: Facilitates the web GIS model by allowing multiuser editing scenarios and long transactions via feature services. For more information, see branch version scenarios.
- Traditional versioning: Provides the flexibility to work within versions for long transactions when accessed directly from the enterprise geodatabase and a simplified editing experience when using feature services to accommodate shorter transactions. Versioning can be applied in various scenarios depending on each organisation's business requirements. For more information, see traditional versioning options.
- Traditional versioning
When you initially add or create a dataset in an enterprise geodatabase, the dataset is not registered as versioned, and it is considered non-versioned data. Before you can edit a dataset in a version, you must register the dataset as versioned.
To register your dataset as versioned using traditional versioning, complete the following steps:
1. Connect to your enterprise geodatabase as the dataset owner in the Databases folder of the Catalog pane.
2. Right-click the dataset and click Manage. The properties dialog box appears with the Manage tab active.
3. Check Versioning and select Traditional.
4. Click OK. The dataset is now registered as versioned.
- Branch versioning
When you initially add or create a dataset in an enterprise geodatabase, the dataset is not registered as versioned, and it is considered non-versioned data. Before you can edit a dataset in a version, you must register the dataset as versioned.
The pre-requisite steps along with the registration process will prepare the datasets for use throughout the platform, offline, and across portals.
Prerequisite:
Before you register a dataset as branch versioned, there are a number of requirements that must be met:
1. The enterprise geodatabase must be 10.6 or later. The following database platforms are supported:
- IBM Db2
- Microsoft SQL Server
- Oracle
- PostgreSQL
- SAP HANA
2. The dataset must have global IDs and editor tracking enabled using UTC time standard.
3. The following dataset types and conditions are not supported when registering as branch versioned:
- Datasets that are registered with traditional versioning.
- Datasets that have archiving enabled.
- Datasets participating in relationship classes, where the primary key of the relationship is the Object ID field.
- Datasets with unique indexes.
- Raster datasets.
- Oracle compressed tables.
Caution:
Once you have registered a dataset as branch versioned, the minimum client version required to access the dataset is ArcGIS Pro 2.1. This also means that the dataset will no longer be available for use in ArcMap.
To register a dataset as branch versioned, complete the following steps:
1. Connect to your enterprise geodatabase as the dataset owner in the Databases folder in the Catalog pane .
2. Right-click the dataset and click Manage. The properties dialog box appears with the Manage tab active.
3. Check Versioning and ensure that Branch is selected. Archiving, Global IDs, and Editor tracking are automatically checked if not previously configured for the dataset.
4. Click OK. The dataset is now registered as branch versioned.
- Unregister a dataset as versioned
You may want to unregister a dataset as versioned if it is no longer needed in the versioning environment or if you need to perform data loading and don't want the overhead from the extra version tables and indexes. To unregister as versioned, an exclusive lock is required on the dataset.
NOTE: When you unregister a dataset as versioned, all versioned edits made in named versions that are not posted to default will be deleted. To prevent these edits from being lost, ensure that all named versions are reconciled and posted to default before unregistering the dataset as versioned.
To unregister a dataset as versioned, complete the following steps:
1. Connect to your enterprise geodatabase as the dataset owner in the Databases folder in the Catalog pane .
2. Right-click the dataset and click Manage. The properties dialog box appears with the Manage tab active.
3. Uncheck Versioning.
4. Click OK. The dataset is now unregistered as versioned.
- Getting to know branch versioning
Learn about the branch versioning model developed for ArcGIS Pro and ArcGIS Enterprise and how you can put it in to practice and explore how to set up branch data, share it with the organisation.
- Training courses
Ready to learn more about versioning and managing data and content? Select the training course that best meets your needs.
Configuring Branch Versioning in ArcGIS
Sharing Content to ArcGIS Enterprise