From overhead projectors, to VCR machines, to interactive whiteboards, the wave of new technology into the classroom is here.
In our digitally-powered economy, today’s students need to be more confident with emerging technologies than ever before – they need to be able to access information, problem solve, communicate and decision make with ease. As a result, GIS has been recognised as an imperative tool to teach spatial technologies in classrooms across the globe.
Over the past decade, we have moved from GIS being an additional and optional tool in the classroom, to now being included in curriculum and syllabi; becoming a mandatory addition to the educator’s toolkit.
With research into the integration of GIS in the classroom being limited, outdated, and abroad, many teachers are left feeling somewhat lost. Although they are ready and willing to implement GIS, Australian educators are left stuck on the how. The main question I receive is how can I do it?
While there are many great articles and resources that speak to the benefit of using GIS in the classroom, the purpose of this blog is to explore the how.
As many teachers would agree, it wouldn’t make sense to explore the how without exploring the best pedagogical practices. Using GIS in the classroom requires student centered learning, for students to explore, analyse, create, and publish their own maps. Inquiry-based learning is already prevalent in geography and science classrooms as students investigate new topics. Whether completing a geography or science inquiry, the process remains the same; asking, creating and analysing data. Similar to the way industry professionals navigate their own problems and inquiries, GIS provides students the vessel to do so.
So what do you need for the journey to stay afloat?
The first thing that comes to mind for the most teachers is the old-fashioned computer lab with ArcGIS software installed. Although many schools still contain a (somewhat working) computer lab, most schools have a personal computer program. The movement towards cloud-based GIS means that it doesn’t matter which of these scenarios your school fits, as ArcGIS Online can be accessed without prior software download. All that is needed is a stable internet connection (which I know from experience, can be challenging at the best of times!).
Pedagogy and software out of the way, we need to focus on the how of implementation.
The first is that you spend some time (one to two lessons) with students, going over the basics of ArcGIS Online. This would best work with teacher-led instruction, with a projection of the teacher’s computer. Students could then follow along, in a live demonstration, to understand the fundamentals of the software. Whilst this allows for both visual and auditory learners, it is still important to provide students with a scaffolded instruction booklet, or a lifejacket as I like to call it! This serves two purposes: students can become easily lost if they miss a step, and they can use it for reference in coming lessons. It can help them from drowning in the deep waters of new technology. The scaffolded instructions are also imperative if you are teaching English as an additional language students. The instructions should be detailed enough that a student could complete the task solely from them.
After the initial introduction to ArcGIS Online, students can begin their inquiry process – the fun part! If computers allow, this process works best as individuals. Students have the power to individually develop their own ICT skills, critical thinking, and problem-solving skills. They can captain their own ship. That being said, it is important at the end of an individual project to share their work, because the power of GIS allows students to create and present their data in drastically different ways. Working in groups is powerful as students can problem solve together, and collaboratively investigate the problem. However, experience and literature has taught us that more than two pupils per computer will severely reduce learning outcomes, so be sure to limit group size.
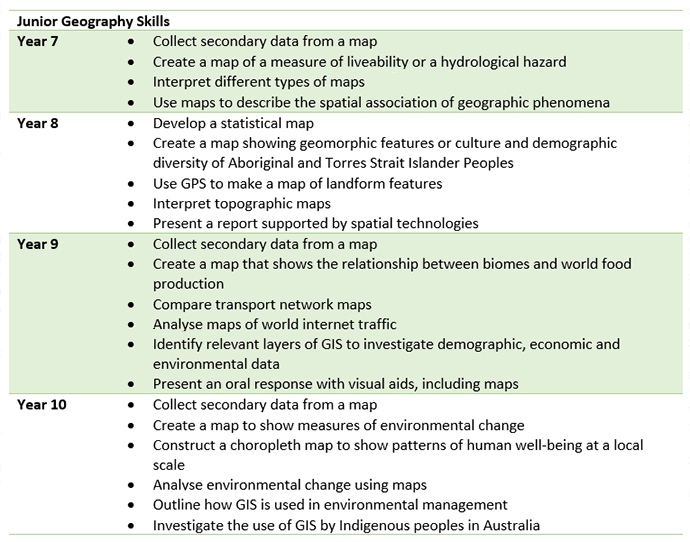
One of the biggest mistakes that I have witnessed in schools, is not understanding the scale at which students should be using GIS. When a new software becomes implemented in mainstream classrooms, teachers can become overwhelmed with the endless possibilities it possesses (I know I began fantasising about all the things my class could map!). It becomes important then to look at what each year level is required to do with spatial technologies, to avoid getting carried away. Adapted from ACARA, these are the spatial skills needed in the geography classroom, divided by year level. Due to the varying nature of senior geography across Australia, this has been omitted.
Beyond your own classroom, the next hurdle is encouraging a wider update of GIS. The good news is that teachers recognise the importance of GIS and are willing to introduce it, if the learning materials are already created. This can be a heavy burden on the passionate teachers navigating the implementation of GIS in their school, however, like the students, research and experience shows that after some exposure these teachers will be able to swim in the deep end, eventually.
We know that the perfect classroom doesn’t exist, that a reliable school network is a myth, and sometimes students lack even basic digital literacy, but we also know that the power of using GIS far surpasses any resistance you may face. Starting in the earlier years will ensure that by senior years students will be able to map anything they want. Small, scaffolded, achievable goals, and the support of your colleagues will make the journey smoother. While it might seem as if we are navigating uncharted waters, if I have learnt one thing from visiting Australian schools, it is that your students will surprise you.
To find out more about Esri Australia’s GIS for Schools program, call 1300 635 196 or send us an email.