Story maps are a powerful, effective way to transform your data into a visually compelling format that brings clarity to complex information.
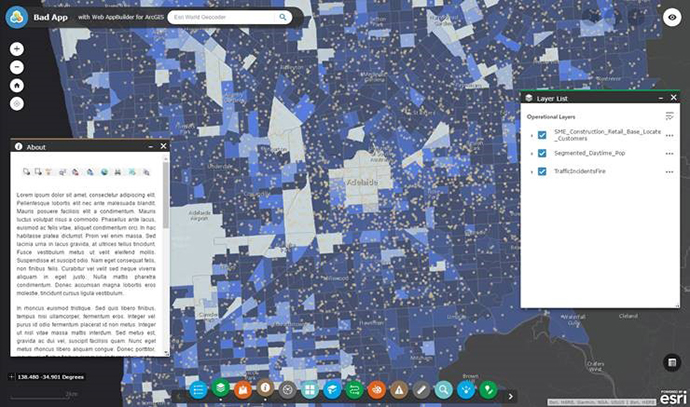
When visualising complex analytics, one of the key themes that emerges is the unfortunate trend in GIS web applications of overstating the general user’s interest in manipulating a map display.
All apps require some element of learning for a user to understand how the app works and to start getting answers.
A great example of instant familiarity is the OECD regional wellbeing web app. Its combination of app, infographic and text has users getting answers within seconds of arriving on the page. This example would have required extensive customisation, so it’s not a solution suitable for all organisations.
Many location based apps are designed exactly how a GIS analyst would want to use them. This is fine if the designer is physically instructing a new user on how to use it. However left to their own devices, new users may be overwhelmed by the functionality they perceive to be in excess, and frustrated by the lack of intuitiveness of the interface.
This was of course not the designer’s intention. They just wanted their application to do everything that their stakeholders want…
But you know what they say - when you try to please everyone, you please no one. Apps are no exception.
If you have complex data to convey, or simply want a more effective way of communicating information, consider a story map. This way you can guide your audience into the visualisation or functionality, and explain how it's relevant to your narrative. But, where to get started?
Here are my 10 tips for a successful story map.
1. Get inspired
A great story map starts with an idea – but it can be hard to envisage how it's going to look without some inspiration. Head to the Story Maps website to browse the gallery of story maps submitted by Esri staff and the user community.
While you're getting ideas, run through one of the step-by-step tutorials to get versed in the fundamentals.
2. Choose the right StoryMap app
There are several Story Map templates with different layout options, but which one is going to be the best to tell your story in a compelling way? Answering that will involve some measure of experimentation, perhaps even trying all of them.
3. Gather the components
A successful story map is going to involve a whole lot more than just a map, it will need plenty of multimedia and of course narrative text to accompany it. Consider the size and formats of your media, just use common sense to optimise performance and quality – don't go using a 5MB image for a thumbnail, neither should you try to stretch a 64KB image full screen.
Once you start storyboarding your ideas, get your data into a web map and symbolise it appropriately. It's fine to keep all your data layers in one web map, you'll be able to control which content displays on each Story Map page.
4. Build it (I know, this is only step four!)
So now you've got a story, maps and media – it's time to put it together. After being inspired by some awesome examples, you'll have some idea of how you want it to look. It's time to launch Story Map Builder to take a first pass.
The builder will take you through the first few steps – the default settings are almost always good, but don't be afraid to experiment. As you get in to it, you'll learn what's working and what's not.
5. Refine and simplify
Take a step back and take a critical look at your story. What's working and what isn't? There's a common temptation to add too much interactivity in the map.
To keep it simple, consider using action buttons as part of your dialogue – this will make sure that the user changes the ‘main stage’ content at the right time, while keeping the reader engaged in the narrative. See a full example of this here.
6. Repeat
Go back and do more of step 5. Cut it down as much as possible! Anything that isn't helping your audience to fully understand your message is working against them, so less is more.
7. Send it to your Mum
You don't have to literally send it to your Mum – but get someone who isn't a GIS person (unless your Mum is a GIS person) to review your work. You may think your Story Map is the best thing since sliced bread and highlights your points perfectly – but your opinion doesn't really matter once it's gone out to a broader audience.
A fresh set of eyes may find that something obvious to you needs further explanation, or some jargon needs to be replaced with plain language.
8. Test on different devices and browsers
You don't have to go crazy here and test everything from an old 4:3 monitor to a 27" Retina display – but at the very least you should check how it looks on a mobile device. Try it on both iOS and Android, or even Windows mobile.
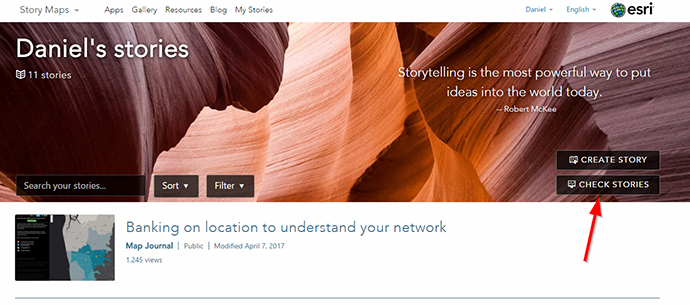
9. Check your connections
Log into MyStories to use the ‘check stories’ functionality – it will let you know at a glance if any premium map content, maps, images, or media are unavailable. If something is up, you'll get a big red traffic light showing what’s wrong and how to fix it.
10. Flaunt it!
You've spent all this time and energy producing your story. It would be a shame if it hardly got any views. Even if it's for internal use only, it's still important to socialise it. Create a relevant thumbnail, and maybe add it to your organisational gallery or featured content to make sure it's seen.
Harness the power of smart mapping technology to tell your story. Sign up for a free 21-day trial of the ArcGIS platform today, call us on 1800 870 750 or send us an email.